MOS Module Configuration
This section assumes that you are using Octopus Newsroom as your NCS solution. For integrating your system with other 3rd parties that support MOS, don't hesitate to get in touch with our support department.
What is MOS?
MOS is the abbreviation of Media Object Server Communications Protocol, a communication protocol between Newsroom Computer Systems (NRCS) and Media Object Servers (MOS) such as Video Servers, Audio Servers, Still Stores, and Character Generators. For more details, please visit http://mosprotocol.com/.
What is Octopus Client?
Octopus Client is Java-based studio automation & newsroom computer system (NRCS) which enables multi-team collaboration to provide integrated workflow between graphic systems, studio teleprompters, etc. For more details, please visit https://www.octopus-news.com/.
MOS Settings via Octopus
Before you begin, make sure that you uncheck the Disable checkbox.
Modify the following parameters on the image above as:
mosID: ZDMOS will be the default name after you license your NRCS product. Both RealityHub and Octopus must have the same name.
ncsID: This is the Newsroom Computer System device’s ID. In our case, it is Octopus.
Media Host: IP address of the computer your RealityHub Server is installed.
In the RealityHub MOS Module, the Host represents the machine that Octopus MOS Gateway is running.
Media Port (Lower), Rundown Port (Upper): These two ports are designated MOS protocol ports to communicate with the NCS automation. RealityHub default ports are 10540 and 10541, respectively.
There is a third port some systems use which is called Query Port, and its default value is 10542
Activating the ZD PLUGIN for Octopus
To establish a bridge between Octopus and the RealityHub, you must activate ZD Plugin. To do that:
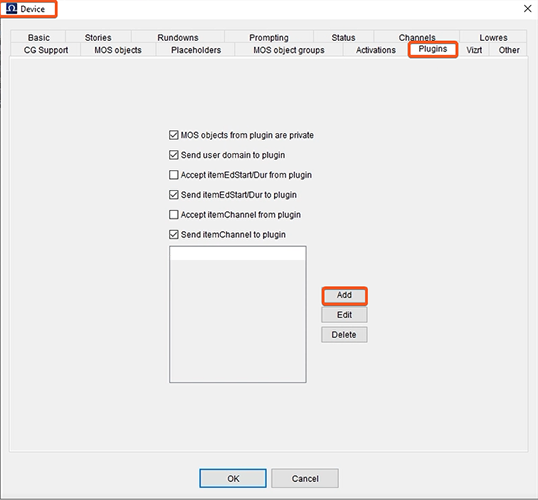
In your device settings:
Select Plugins
Click to Add button
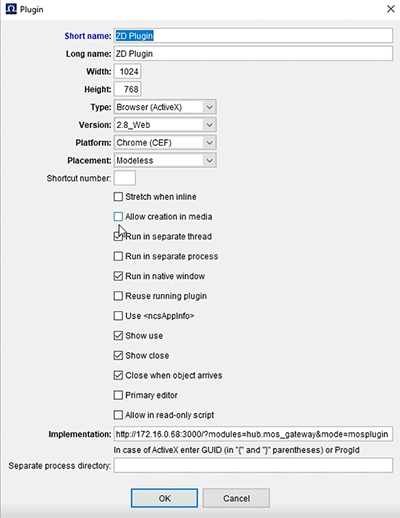
In the plugin configuration window, fill the areas as shown in the image above and click OK
Note: Width and Height can be different based on your needs, such as 1920x1080 or similar.
The Implementation property on the image above is for illustrative purposes only.
Users must define their RealityHub Server IP Adress in Implementation as following: http://<Your RealityHub Server IP Adress>/?modules=hub.mos_gateway&mode=mosplugin
RealityHub MOS Module Configuration

To fine-tune the RealityHub MOS Module as shown on the image above:
Select the ⚙ Configuration under the main Menu
Go to the MOS Module and select the Configuration
Under the MOS Module Configuration settings:
Define the FPS rate of your graphic templates
Provide a mosID you defined earlier in the Octopus settings
Define the MOS Heartbeats for the NCS in the hearthbeatInterval section
Click ➕ to Add your NCS Device(s)
NCS Device(s) details:
Your Device ID in the RealityHub must match with ncsID. In our case, it is Octopus.
Choose a Multibyte Encoding (UTF-8 or UCS-2BE) matching your workflow.
Select one of the supported MOS Version matches with your system. The RealityHub currently supports MOS version 2.6 and version 2.8.5.
Host in the RealityHub must be equal to the Octopus IP Address.
As we mentioned earlier in this topic, RealityHub uses Port 10540 and Port 10541 for communicating with NSC devices using MOS protocols. Fill the areas as shown on the image above for NSC Lower Port, NSC Upper Port and, NSC Query Port.
Select the Enabled from the dropdown menu.
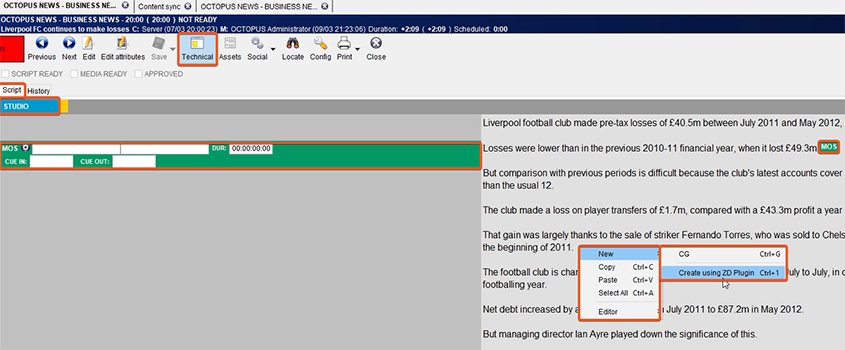
Check your MOS Devices settings if you accurately establish the connections. The green color represents that you established necessary connections. When creating a new MOS, use Create using ZD Plugin, as shown in the image above.