Adding Host
In RealityHub terminology, a Host refers to a server configuration that hosts an Engine; in other words, it is the computer you install the Reality Engine. It is essential to add a Host for accessing your Reality Engine(s) and control them via RealityHub.

The image above shows the default Hosts interface.
To add a Host:
Go to Main Menu > select the Configuration
Select the Hosts under the Engines
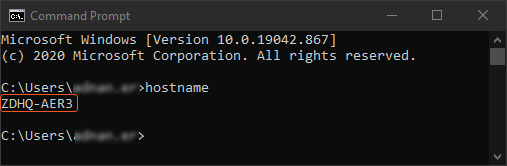
Find your hostname:
Run the Command Prompt on your Windows
Type hostname and click enter
Copy your hostname
Now:
Turn back to Hosts configuration
Click ➕ to Add a New Host
Paste the Host Name you copied earlier
As soon as you define a hostname; RealityHub adds a default Display Name, IP Adress, Port, Cache Directory, and Installations.
Display Name: You can define a specific name for your Host to better organize your setup. Your computer’s hostname (in our case it’s ZDHQ-AER3) might not be useful in recognizing the purpose of your engine. To set an example, if you are utilizing multiple engines in a studio, you might want to define a specific name for your Hosts such as Studio A, Camera B, etc.
Please keep that in mind, the Host Name refers to a server’s hostname, it has to belong to your server configuration.
IP Adress: IP address of a server you installed the Reality Engine.
Port: 6666 is the default port for the Reality Engine. If you changed the port number during the installation, you must provide that specific port number.
Cache Directory: A directory you can use for caching your Reality Engine projects
Can Cook: Disabling and enabling the Cook operation for your Engine. See Cook Manager
Enable Launch: This option gives you the ability to specify which Engine can be launched
Installations: You can choose or redefine the directory you installed the Reality Engine.
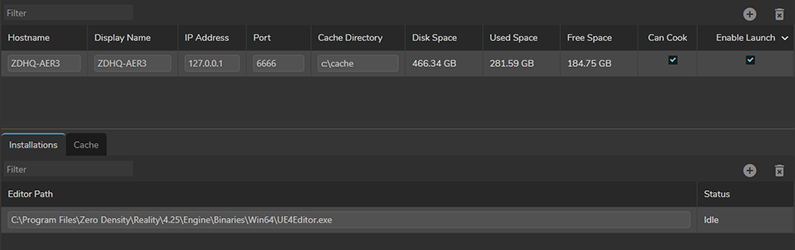
IP Addresses or names on the images above are for illustrative purposes only.